

Hi guys! I’m not posting much of Game News lately because I am busy IRL and also busy playing this game. Liberation of Azure also known as Liberation of Blue Sky is an ARPG for Android and iOS. I have bunch of friends who are intrigued and want to test the game out but unlike me, they don’t know how to mess around Japanese games so I am posting a simple tutorial to help out English players on how to play this Japanese game.
I will post pictures with English Description. I will try to explain them one by one but take note that most of the translations are based on how I understand its function. Not everything is the translation of the Japanese word written in the button. I can not read any Japanese writings.
HOME SCREEN
UI:
Multi Rank – This is your current player level for Co-op. This level only increase when you play dungeons on Event Quests. Multi Rank level is important as players creating Co-op rooms can set the room to only accept players of certain rank.
Energy – It is the famous energy system of mobile games, I’m pretty sure you guys know how it works. You can increase your max energy via Class Skill. To do that you must upgrade an Orange Shoe Icon in the Class Skill Tree.
Gems – This is an in-game currency. There are 2 types of Gems (Paid and Free). Free Gems are always prioritize when consuming Gems. You can also use Gacha using only Paid Gem for a lower Gem Cost.
Seoul Crystal – This can also be defined as Experience Crystals. This are acquired from enemies you defeated. You can use these crystals to increase the level of your units. 1 Seoul Crystal is equal to 1 Exp.
BUTTONS:
Home – Pressing this button will sent you to the Home Screen.
Story – Pressing this button will sent you to the Story Quests. The Red Story Quest are the Main Quests while the Blue Story Quest are the Side Quests.
Event Quests – Pressing this button will sent you to the Event Quest Screen. This is also where you can do co-op quests with other players.
Units – Pressing this button will sent you to your Unit Party Screen. Here you can view your current party, your available units and other units and equipment related stuff.
Gacha – Pressing this button will sent you to the Gacha Screen. This is where you can Summon Units, Summon Weapons or trade Fairy Tears. This is where you will be spending your hard earned Gems.
Settings – I think this is self explanatory.
Chat – Pressing this button will sent you to the Chat Screen. On this screen you can chat with other players and add or remove friends.

EVENT QUESTS SCREEN
Everything you see in here are Event Quests or Daily Dungeons. The one at the very bottom is the Rank Quests that you can beat to get tons of Multi-Rank Exp. I will be explaining the small buttons on Event Quests and also the Look for Party Button which is on the lower right.
Look for Party – This button will show you a list of rooms created by other player. You can join these rooms to play with other players. Be advised that playing with other players via this button does not consume energy. This means that you can play all day via this mode.
Dungeon Info – The Question Mark Square Button is the Dungeon Info. As an English Player, we will not be using this button as the information is on Japanese (duh? It is a Japanese Game).
Dungeon Rewards – The Gift Box Square Button is the Dungeon Rewards. You can acquire Dungeon Rewards (Gems, Fairy Tears, Accessory, etc.) by collecting points which you can acquire by playing that Dungeon Event. You just need to play the dungeon over and over again until you acquire the very last reward.
Achievement Reward – The Square Button with Diploma like Icon is the Achievement Reward. You can acquire rewards by completing certain conditions. These are the common conditions in game: Complete Dungeon, Complete without anyone dying, Gain 1st Crown, Gain 2nd Crown, Gain 3rd Crown, Gain 3 Crowns.
Trade Points – The Square Button with a House and Recycle like Icon is the Trade Points Button. You can acquire rewards by trading the points you collected which you can acquire by playing the Dungeon Event.
Once you’ve selected a Dungeon this screen will appear:
Read or Post BBS – This button will lead you to the BBS Screen. Here you will see comments posted by other players about the Dungeon. No one really cares about this button except for few individuals.
Solo – Tap this button if you want to play the Dungeon Solo. In Solo Mode, you will be controlling your Leader Unit while the other is controlled by AI.
Co-Op – Tap this button to create a Co-op room. The loot is multiplied by the number of players. These means that loot drop is can be multiplied by up to 4 times. Also if you Host a room, some of the loot will be multiplied by 2. The multiplier will work as (((Items * Host Multiplier) * PlayerNumber Multiplier) * Mirror Drop Multiplier). This means that you can have a maximum of times 40 multiplier on a single loot.
After you tap Solo or Co-Op. You will have these 3 buttons:
Item Drop Multiplier – This will allow you to use the Mirror Drop Item. The Circle Mirror which is the mirror on the left increases the drop rate by 2 while the other mirror increases the drop rate by 5.
Seoul Crystal Multiplier – This will allow you to use the Exp Multiplier Item. The Seoul Crystal Multiplier will increase the experience received not the Seoul Crystal Drop. However when playing the Experience Dungeon in Story Mode these items increases the Experience received and the Seoul Crystal Drop. The Seoul Crystal Multiplier on the left increases the drop rate by 2 while the one on the right increases the drop rate by 5.
Go – This button will allow you to start playing the dungeon. In co-op, this button is smaller and the color is red. You can not press the button unless all players are ready.


UNIT PARTY SCREEN
Now I will explain the Unit Party Screen. You can create up to 5 party and each party consist of 4 units. You will always be controlling the Party Leader so make sure to set the unit that you want to play as your leader.
Back – You can see this button almost everywhere. When you press this button, it will lead you back to whatever previous page you are at.
Training – This will lead you to a room with a Dummy. You can practice your combos here or you can use this room to check a unit’s attack and skill sets.
Items – There will be more Item Options when you select this one.
Accessories – There will be more Accessory Options when you select this one.
Weapons – This will change the current buttons to the weapon options.
Formation – After you press this button, it will allow you to arrange the formation of your party.
Level Up – This will lead you to a Level Up screen where you can either increase the level or max level of a unit.
Equipment – This will lead you to a Equipment Screen. The screen will show the current weapons and accessories equipped by the unit.
Skills – This will lead you to the unit Skill Tree. On this screen you can either upgrade the unit’s attack or skill.
Set Leader – This will set the selected unit as the Party Leader
Change Unit – This will lead you to a list of your available units. You can select a unit from this list to replace the selected unit. If you select a unit which is already in your party then their formation will change instead.
Unit Info – This will give you a summary of the unit’s equipment and skills. We will most likely not use it as all information is in Japanese.

The buttons below will show after tapping the Item Button:
Upgrade Items – This will show you a list of items which are used to upgrade Skills and Accessory.
Game Items – This will show you a list of in-game items that you currently have. These items includes Summon Tickets, Weapon Tickets and Energy Restoration Items.

The buttons below will show after tapping the Accessories Button:
Upgrade Accessory – This will lead you to a list of your acquired Accessories. You can upgrade the accessories or convert an accessory to Seoul Crystal by taping the small button on the lower left.
Convert Accessory – This will lead you to a list of your acquired Accessories. This page will convert the selected accessories to Seoul Crystals
Increase Inventory – This will allow you to increase your max inventory by using gems.

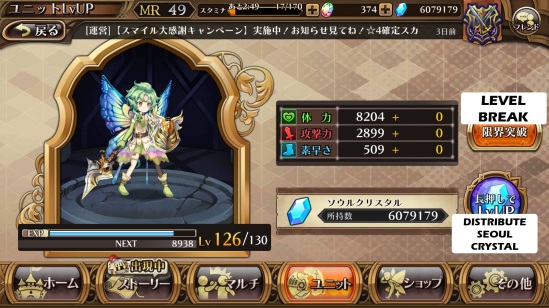
The screen below will show after tapping the Level Up Buttons:
Level Break – This button will allow you to increase the Max Level of your units by using your Fairy Tears. Fairy Tears are acquired through quests and by summoning units which you already have. As the max level goes up, the amount of Fairy Tears needed also increases. By default, the maximum level of a 3 star unit is 80 and a 4 star unit is 100. The maximum max level of a 4 star unit is 200.
Distribute Seoul Crystal – Holding down this button will distribute your Seoul Crystals to the unit as EXP. 1 Seoul Crystal = 1 Exp.
The screen below will show after tapping the Equipment Button:
This screen will show the Weapons and Accessories equipped by the unit. There are 2 buttons available on this screen.
Unequip – Selecting the left blue button will unequipped the selected weapon.
Weapon Info – Selecting the right blue button will show the weapon’s info.

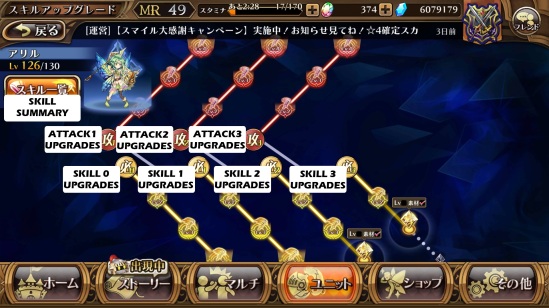
The screen below will show after tapping the Skill Button.
The red ones are normal attack upgrades. By upgrading your normal attack, it may increase the number of hit, damage, or break damage. The yellow ones are skill upgrades. Once a skill upgrade reaches level 3, the skill will have additional effect.
Skill Summary – This show a summary of the skills you have learned for this unit.
The buttons below will show after tapping the Weapons Button
Level Up Equipment – This button will lead you to a list of your acquired Weapons. You can upgrade a weapon by selecting it on this screen. If you press the button on the left side of the weapon, it will show you the Weapon Info instead.
Evolve Equipment – This button will lead you to SR Equipment Evolve Screen.
Convert Weapon – This button will lead you to a list of your available weapons. You can convert the weapons on this screen to Seoul Crystals.
Increase Inventory – This button will allow you to increase the maximum space on your inventory with the use of gems.
Back – The famous Back Button

The screen below will show after selecting an equipment in the Level Up Equipment screen.
Back – It is famous, it is everywhere.
Upgrade – Pressing this button will fuse the selected items into the selected weapon. You can fuse up to 6 weapons. By fusing Weapons, the base weapon will gain experience and can level up. As weapon level increase, the stat also increases. At level 5, you will be able to use the weapon skill 2 times. If you fuse an identical weapon, the weapon will have a star upgrade and a star on the weapon info will be filled. Weapons can have a maximum of 4 star upgrade. Star Upgrade give weapon tremendous boost in stats.
Weapon Info – This button will show the info of the weapon.

GACHA SCREEN
This is where you will be spending most of your Gems.
Buy Game Items – This is where you can buy Energy Restoration Items, Item Drop Multiplier and Seoul Crystal Multiplier.
Trade Fairy Tears – This is where you can trade your Fairy Tears for units and/or Items used to upgrade your Skills and Accessory.
Buy Gems – This is where you spend real money to get gems.
Summon Units – This is where you can spend your gems to gain units.
Summon Weapons – This is where you can spend your gems to gain weapons.

SETTING SCREEN
I only put description on some which you may use in-game.
Game News – Pressing this button will show you the Game News and Events.
Game Settings – This will lead you to Game Settings where you can adjust the volumes, etc.
Cloud Save – This is to save your game progress to the cloud. The game will give you a username and password which you can also send into your email for future reference.
Play Game Opening Vid – Pressing this button will play the intro video of the game.
Copy – Pressing this button will clip the ID on to your phone. You can paste it to a chatbox or wherever you want to inform them your game ID.
Player Info – Pressing this button will show brief description of your account.

You can see my ID in there so you can add me anytime you want. Drop me a message or two if you need help. I will try to help as much as I could.
